VirtualBox & ClusterCS
How to test ClusterCS in your own home using a virtual machine.
1 step: The creation of a virtual machine
2 step: Port Forward in your Router
3 step: Getting Started with ClusterCS
4 step: Add your server to ClusterCS
5 step: ClusterCS CheckUP
6 step: Server SETUP
Advanced setup of the server
ClusterCS added value
1 step: The creation of a virtual machine
Please configure the Virtual Box adaptor so an Internal IP from the same class as your device can be allocated:
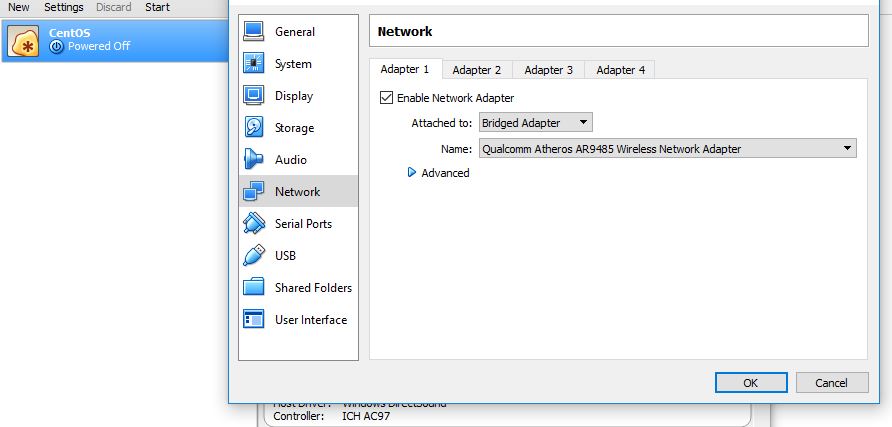
Click right on our virtual machine in VirtualBox -> choose Settings -> go to Network where we must have:
Attached to: Bridged Adaptor, and on Named the LAN interface (the network board or the wireless, depends on the internet you are using on your device and where the virtual machine is instaled).
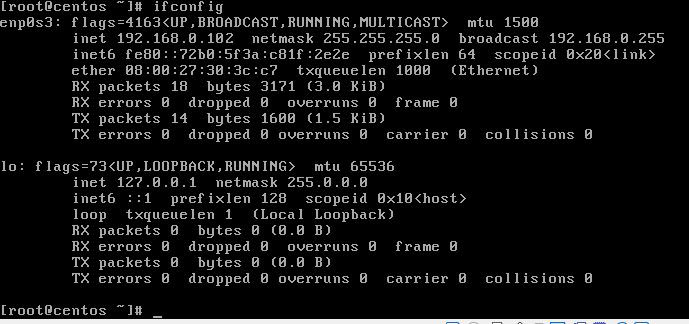
Next, we install CentOS 6.8, and after the installation is completed, we must verify what intern IP was allocated to your virtual machine: to do this, in the terminal we write the command: ifconfig
After the OS is installed and you detect your Internal IP, you must open some ports from your router using Port Forward so your virtual machine could be accessible from outside.
2 step:Port Forward in your Router
1) You access your router in a browser

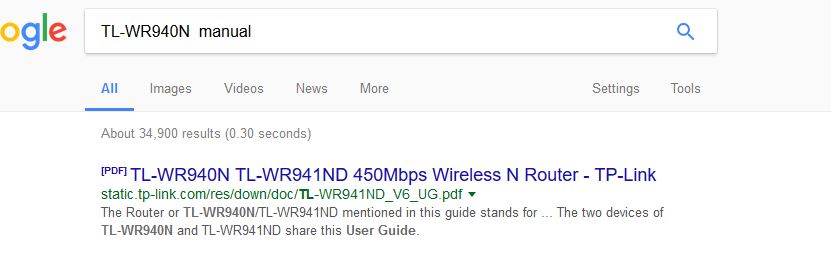
If don't know how to access your router, it is better to read the user manual where you'll find the default IP / user and the pasword.
You can find the user manual on Google, you just need to write the model of your router followed by the word manual.
Click for exemple
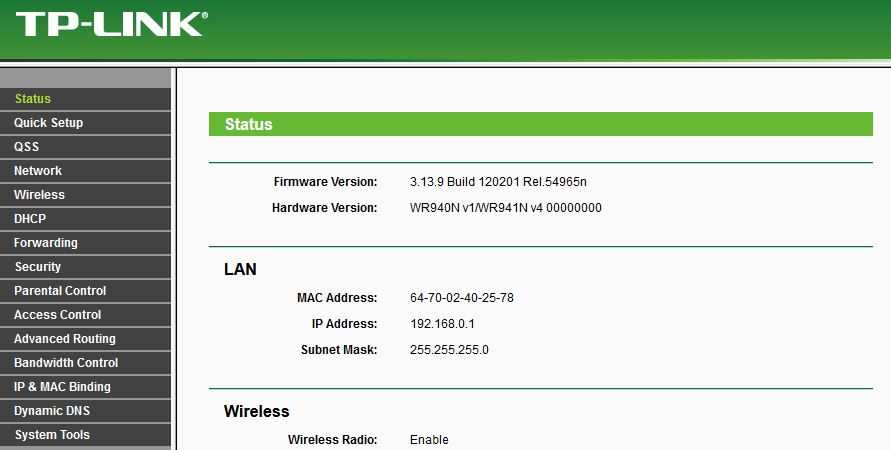
After we have accesses the administration interface of our router, on your monitor, you must see something like that (beware, each producer has his own version of interface )
2) Go to Forwarding where you must add the following ports:
- Port 22 – it will be the SSH, but you can put any different port for the extern.
- Port 3306 – remote connection to MySQL for installation of databases RCM/postfix etc.
- Port 80 – http for the web connection
- 25,465,993,143,110 – for email
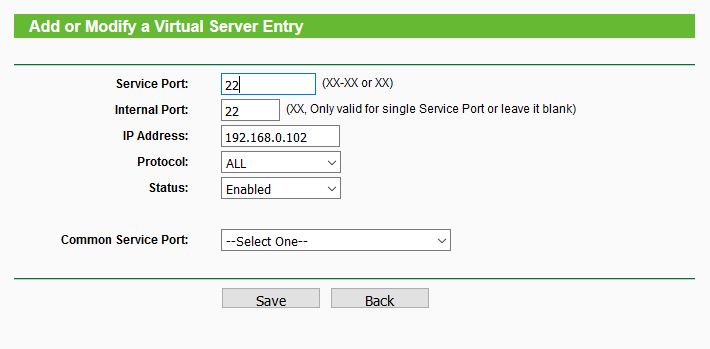
3) The port adding
Click on Add New…, where:
Service Port - is the extern port of the protocol/SSH service, chose 22 for the intern port - SSH 22 (you can choose another port ex: 2222 so that the SSH can be accessed from extern through another port)
Internal Port - the internal port of the protocol/service, in our case SSH 22/p>
IP Address - the internal port of your virtual machine
Protocol - leave All
Status - Enabled
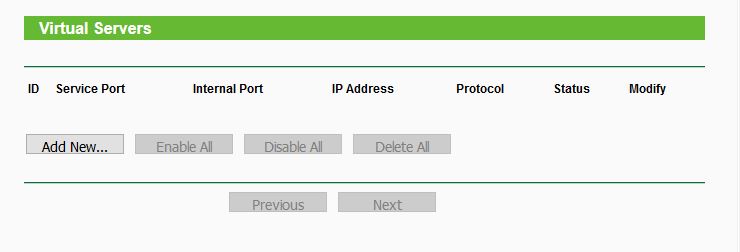
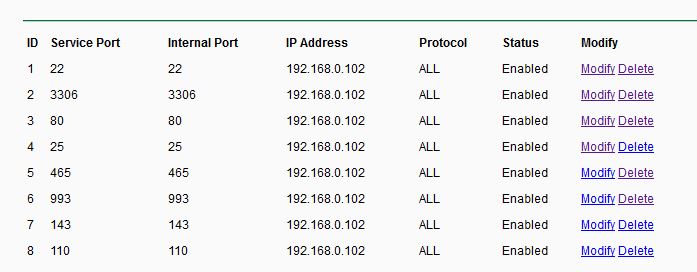
Do this steps for each port mentioned at Step 1, point 2, until, in the end, you will have:
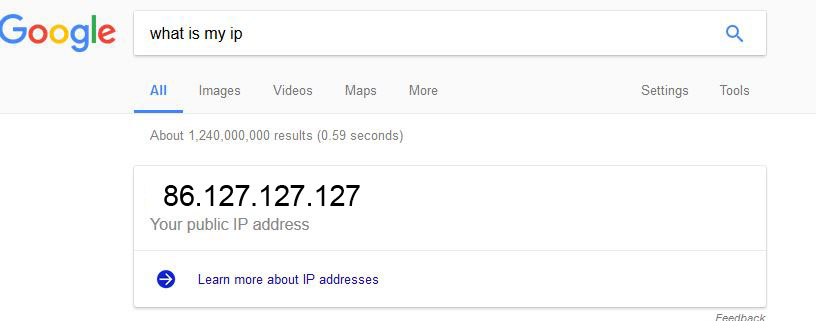
4) Test if you can access your virtual machine from outside:
- first, you must check which is your IP, open a browser and type in Google: what is my ip.
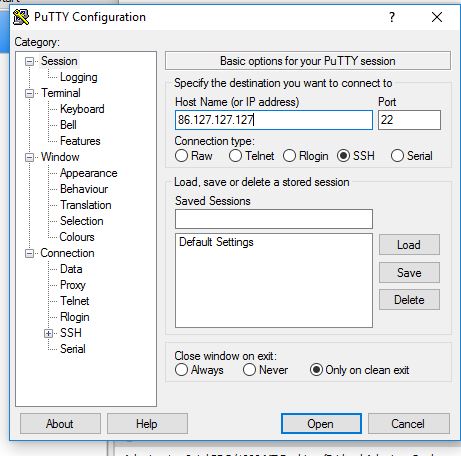
Our extern IP is 86.127.127.127 which we'll use it to connect from outside to our virtual machine.
Open Putty.exe - you can download it from https://the.earth.li/~sgtatham/putty/latest/x86/putty.exe
We must have checked SSH and after we complete the following:
Hostname : your external IP
Port: your port chosen for the SSH connection from outside (see step 1, point 3)
If you can connect with the SSH using the external IP and the SSH port, then you can go to the next step.
If you can't connect, you must double-check if all the above steps are done properly.
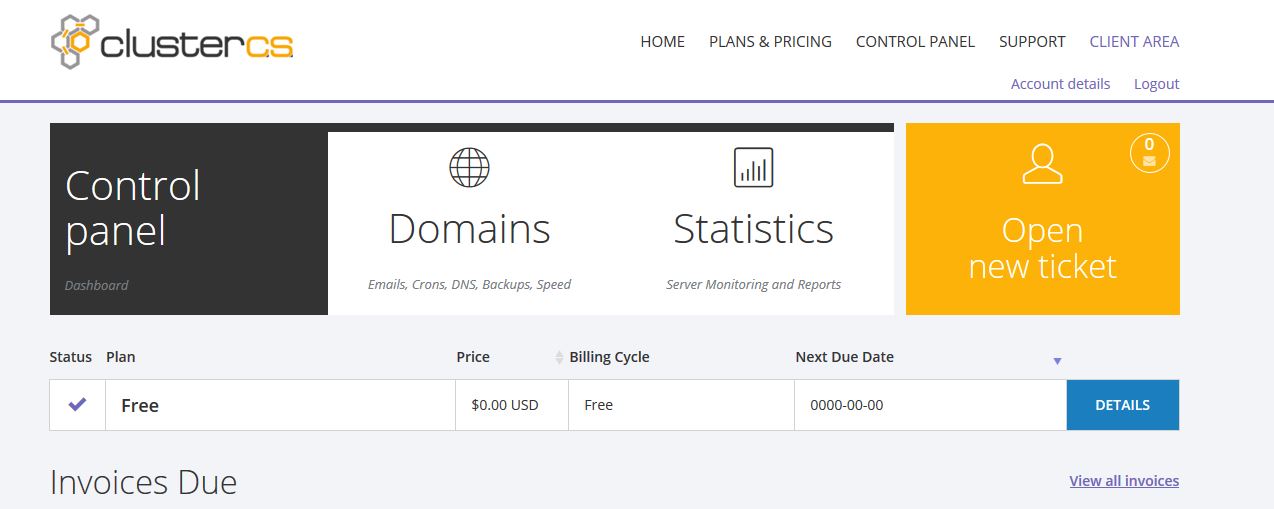
3 step: Getting Started with ClusterCS
Go to www.clustercs.com , register and purchase the free plan.
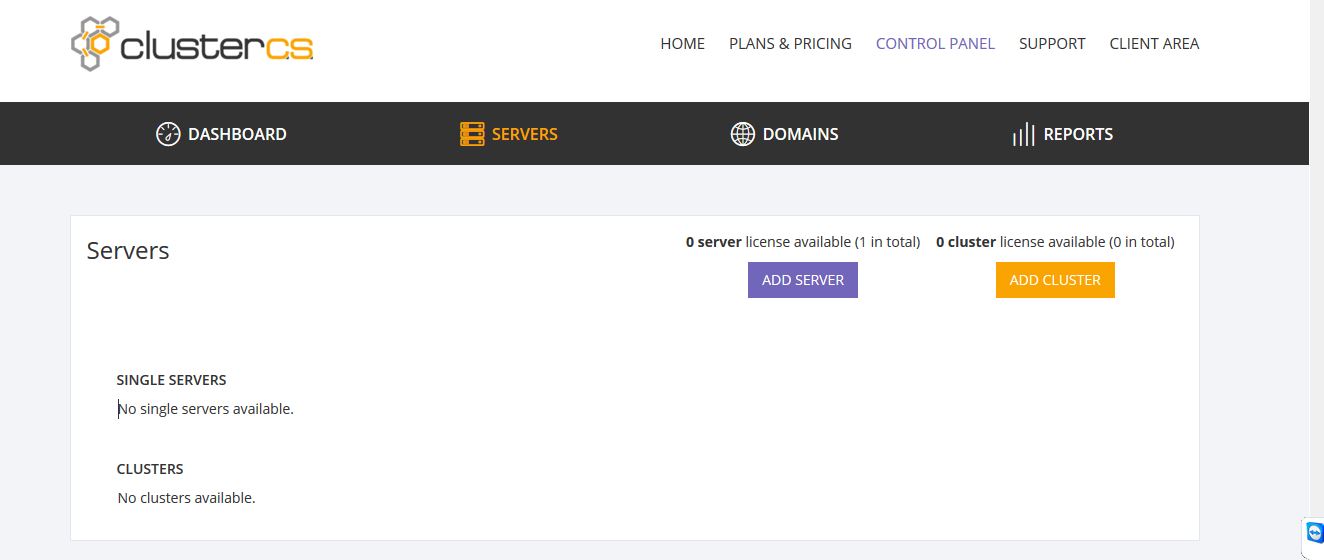
4 step: Add your server to ClusterCS
- Click on ClusterCS control panel – button placed on the top of the page
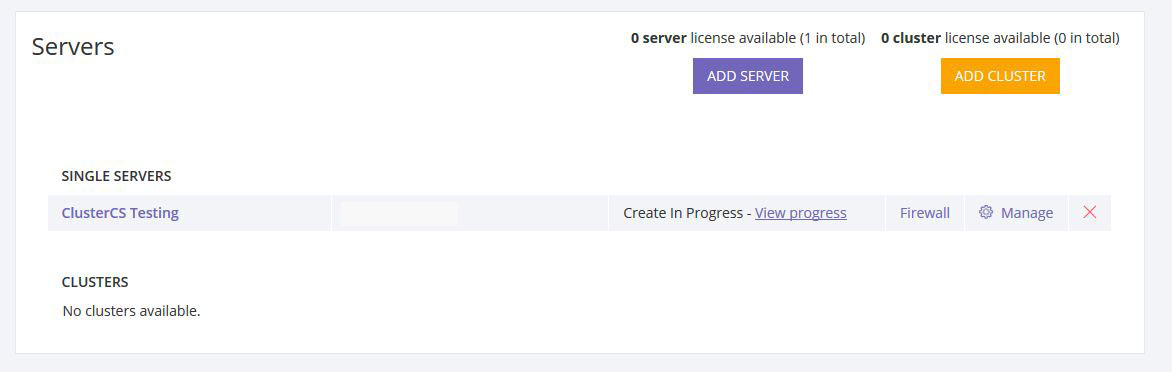
- Click after on Servers where this will pop up:
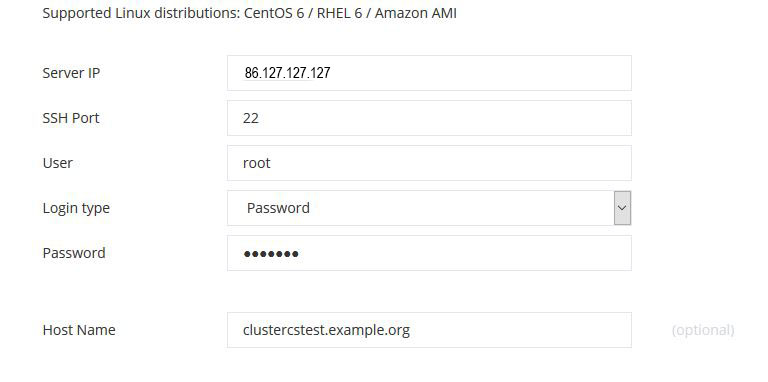
As you can see, for a 1 server license, here, you will be adding the server created in your virtual machine using the credentials:
- Server IP in our case the public IP
- SSH Port in our case 22
- User: root
- Login type (here you have 2 login types: based on password or based on SSH key), in our case we chose Password
- Password - root password
- Hostname it is optional, but you can add a name to your server.
After you entered the above data we can move to the next step by pressing the NEXT button.
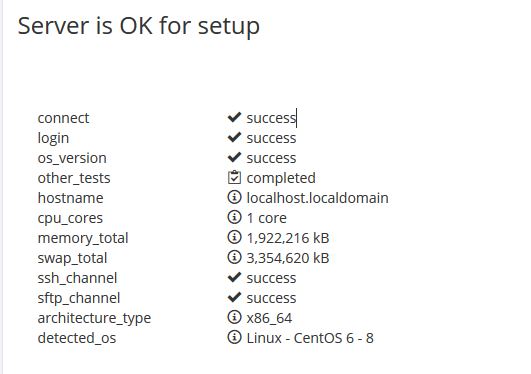
5 step: ClusterCS CheckUP
In the next step the ClusterCS panel checks if your server can be accessed and if the Linux distribution, in you case CentOS 6.8, is compatible.
After, we click CONTINUE TO SETUP.
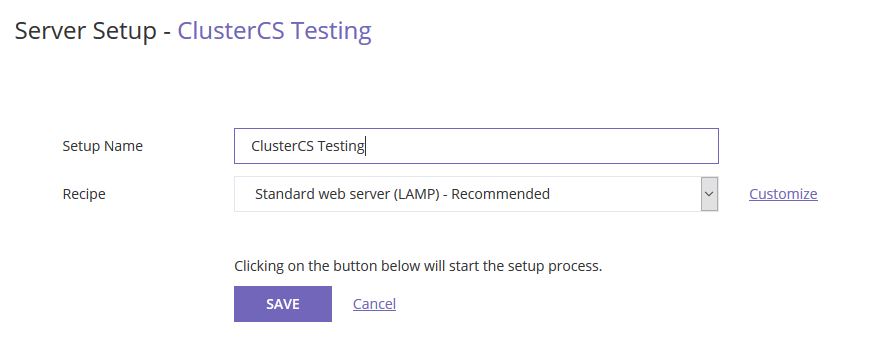
6 step: Server SETUP
Setup Name: a name will be introduced which will be added to our server in ClusterCS, so that it can be easy identified.
Recipe: We chose Standard Web Server (LAMP is what ClusterCS.com is recommended to us).
Click SAVE (see below for advanced setup )
Advanced setup of the server
- Firewall - what type of Firewall to use (default ip tables and fail2ban)
- Smart Traffic Manager – the manager type which will administrate the traffic of our server (default haproxy)
- WebServer – this is the best part, where you can work with apache, nginx, lighttpd in parallel depending the files type, statics or dinamics, optimizing in this way the page loading.
- Database – mysql
- Email – postfix
- Webmail – default is roundcube
- Storage – storage_location and proftpd for ftp
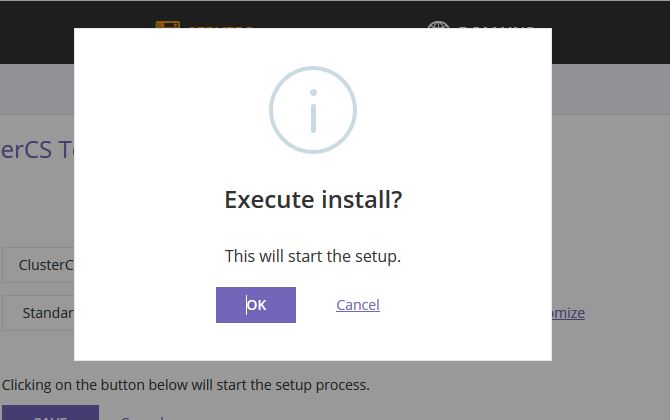
After you completed the setup, click SAVE and after that OK to create the installation package according to our settings. Click OK, then again OK.
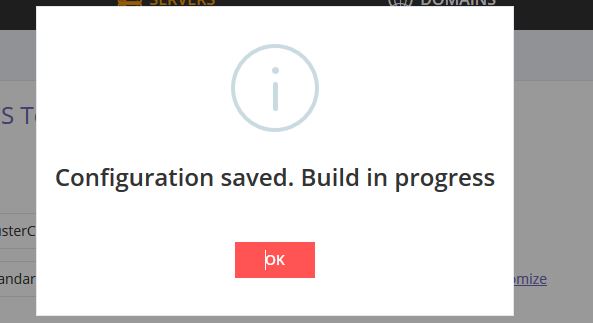
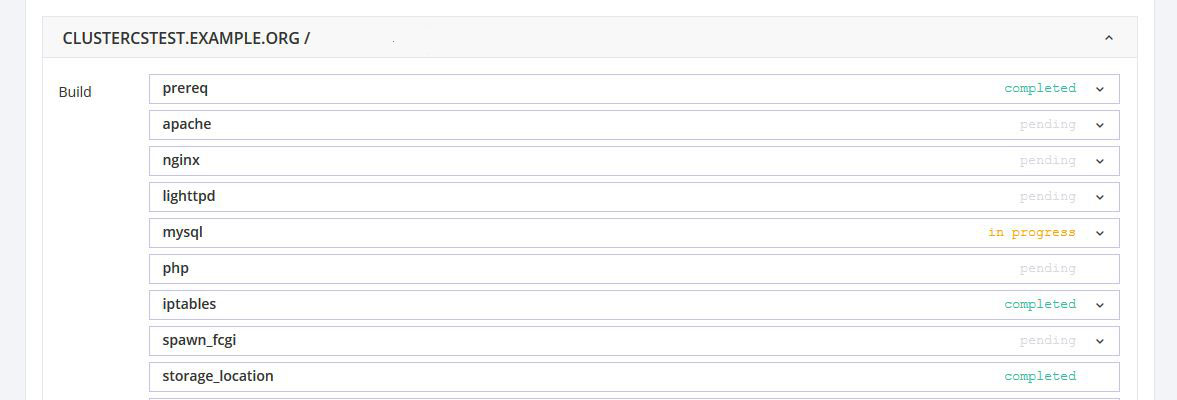
Now, the compilation and configuration process has begun.Click for details
There is even a system to view, in real time, the installation progress of your packages View progress).
At this moment, we must wait until the ClusterCS platform will compile and configure the packages.
Your server is configured and ready to be used.
You can add domains, databases, emails.

The added value of ClusterCS
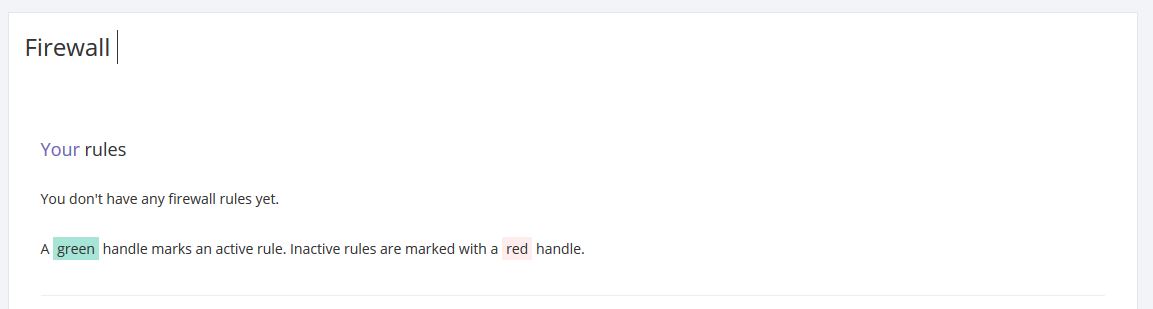
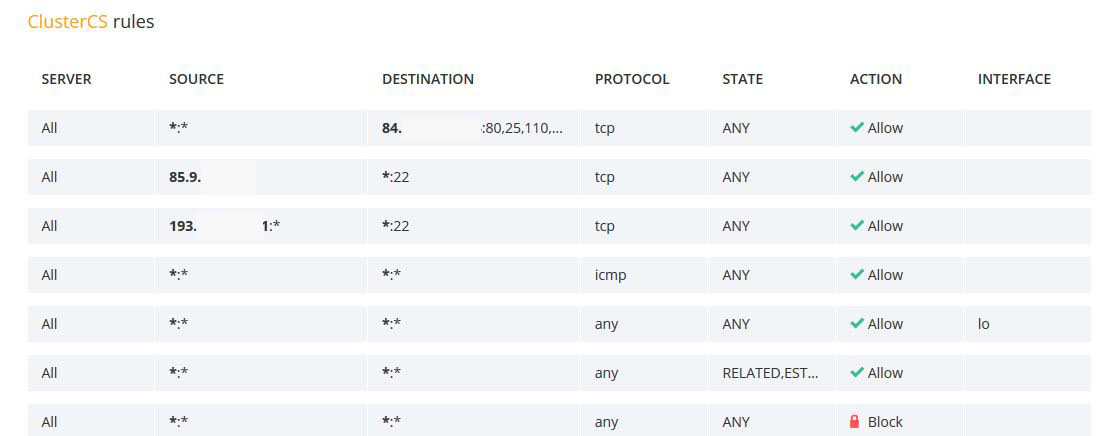
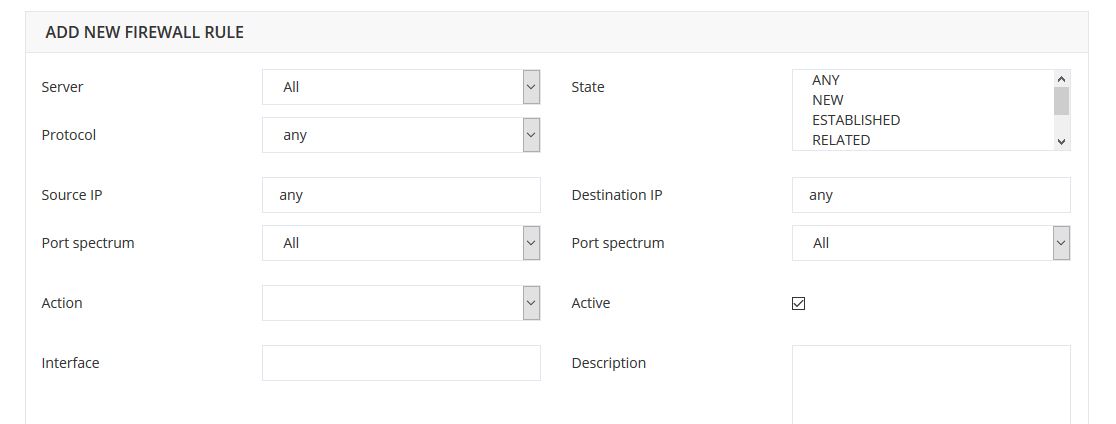
1. Firewall administration from the ClusterCS control panel.
A nice part is the Firewall, which you can administrate using ClusterCS through just one click.
You must just to click on the Firewall button located in the right side of the added server - section Servers.
2. Domain administration
You can manage domains using ClusterCS without needing to have the skills of server management, all you need to do is follow the steps indicated in the ClusterCS interface and add a domain/subdomain in the panel and then simply accessing it./p>
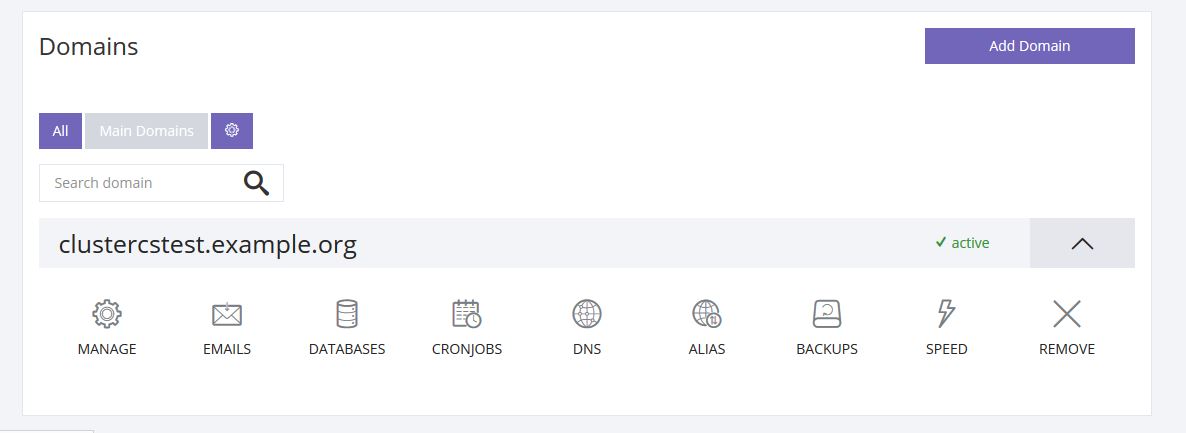
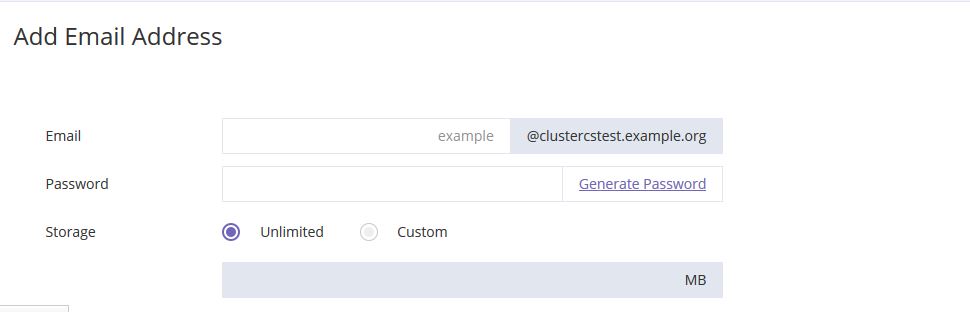
2.1 Adding/deleting the emails
In the add domain, click Emails where you will see different options: accounts visualization, accounts editing and, also, adding some new accounts.
For accessing the emails from your browser, access webmail.domainname.ro in our case http://webmail.clustercstest.example.org
2.2 Database administration (mysql)

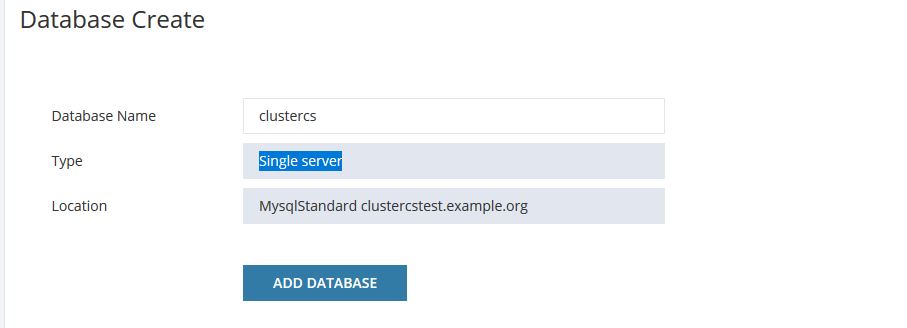
2.2.1 Creating a user database
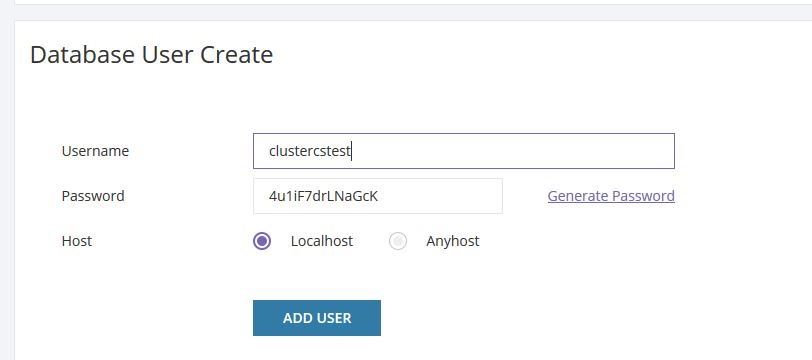
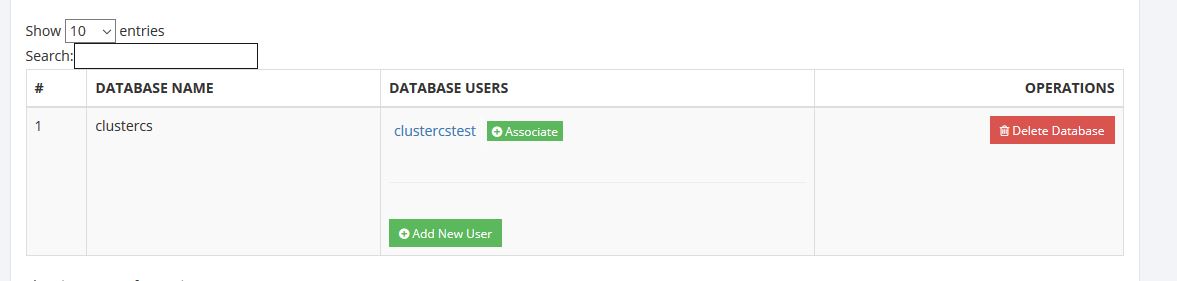
2.2.2 Creating a database and associating with a user database
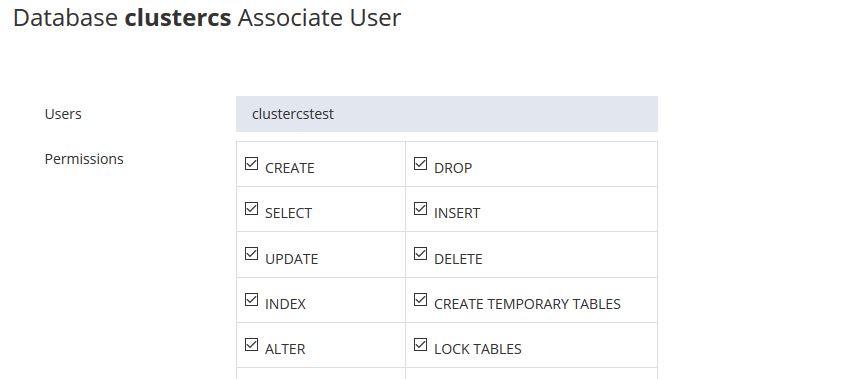
2.2.3 Assigning a database to a user
Click on Associate button and choose the permission that will be granted for that user (in our case - all).
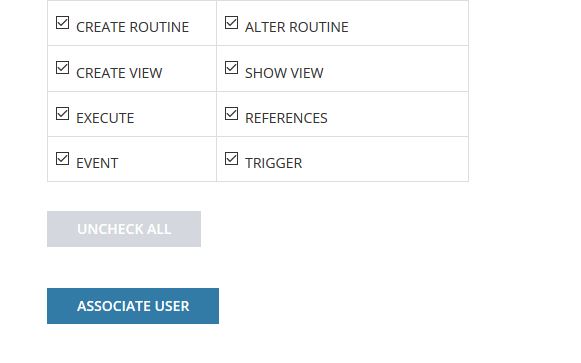
Click on Check All button and after click the Associate User button.
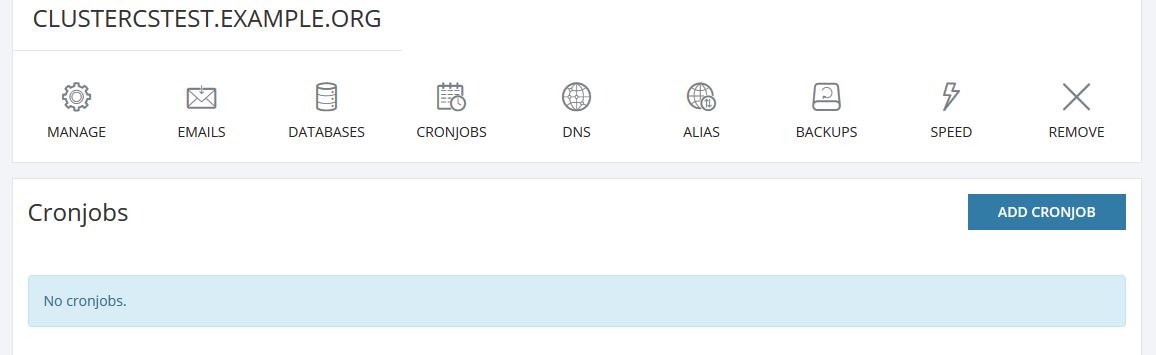
2.3 Cronjobs
We all need automatization, imports/feeds/updates, so this section is dedicated to the cronjobs you want your server to automatically do at a given time.
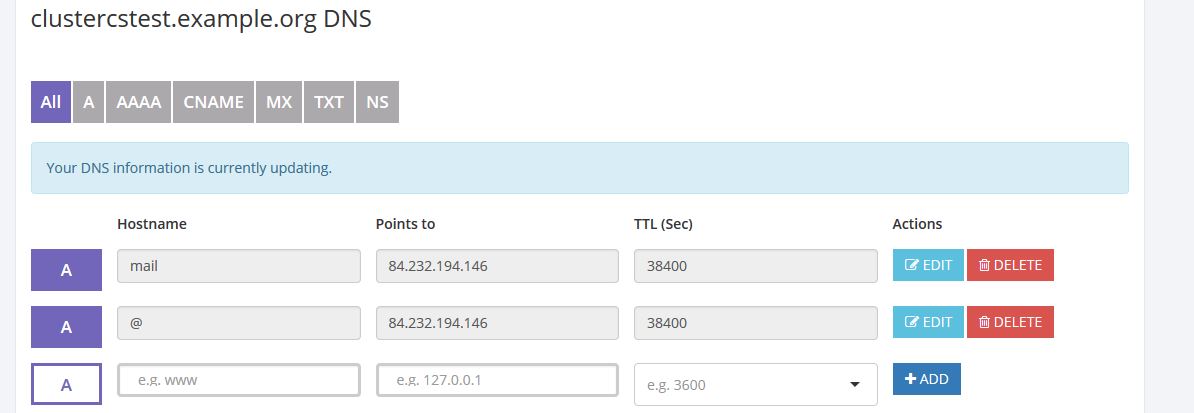
2.4 DNS Management Area
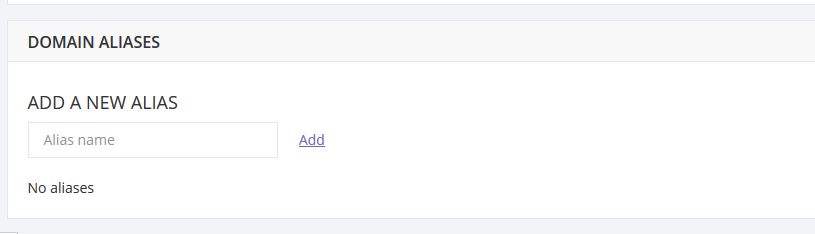
2.5 Adding aliases to the domain
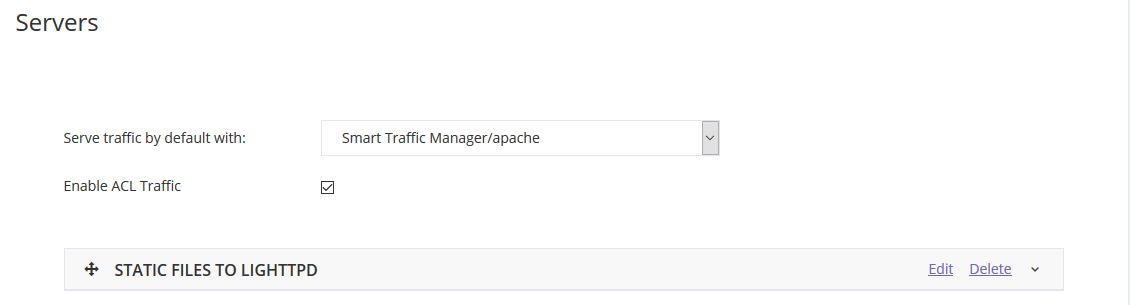
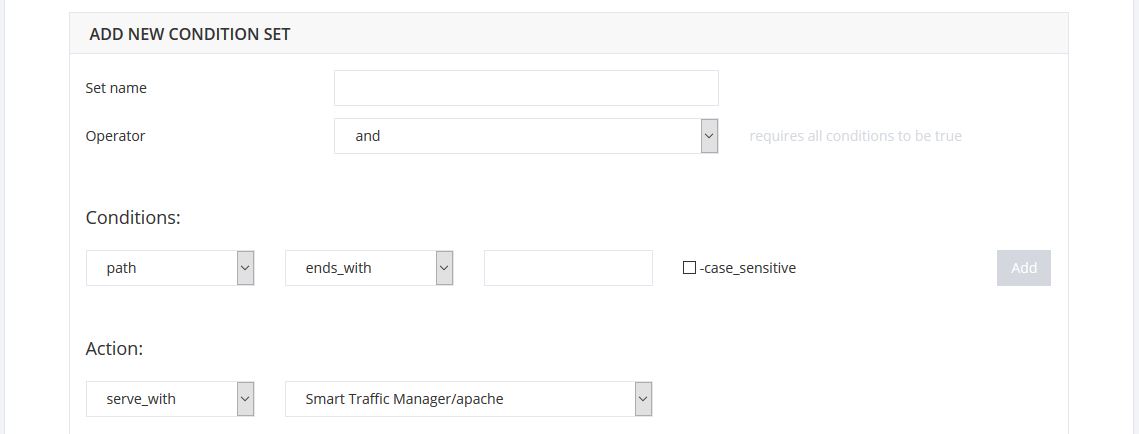
2.6 Pages load optimization using apache + nginx + lighttpd
This section is dedicated to optimizing pages, ClusterCS.com being the first Control Panel offering such a feature.
With the help of this section you can configure how you want the pages of your website to be served.
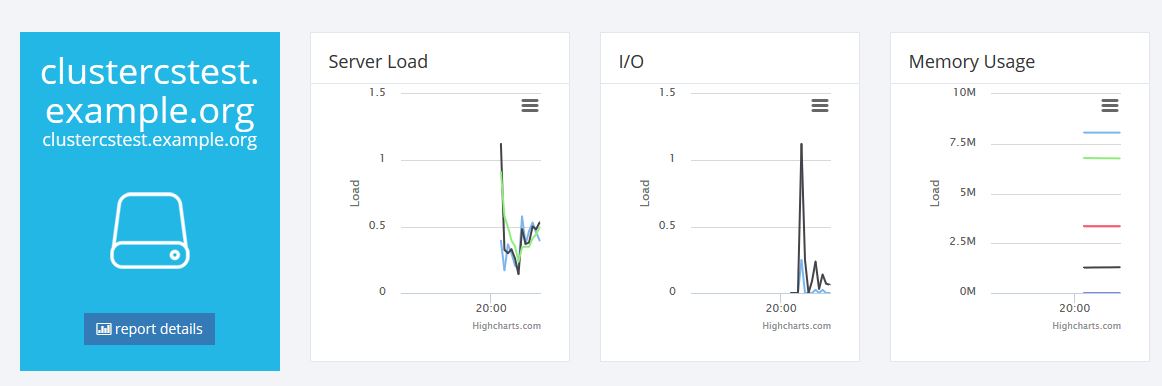
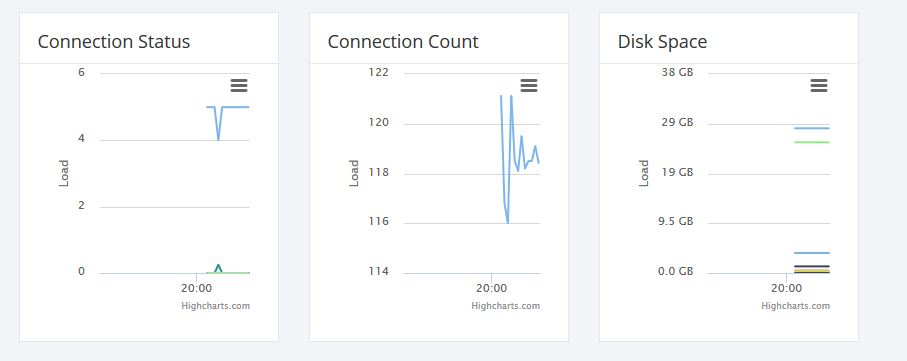
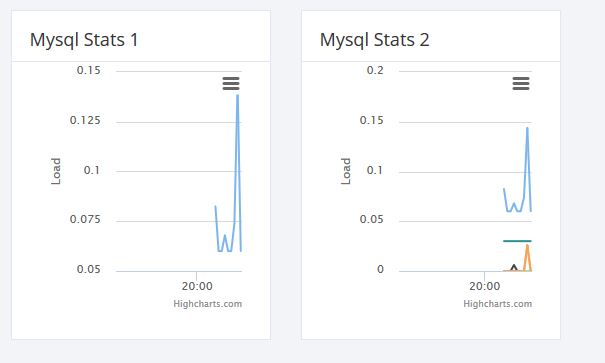
3. Server reports
4. Accessing a test domain using hosts
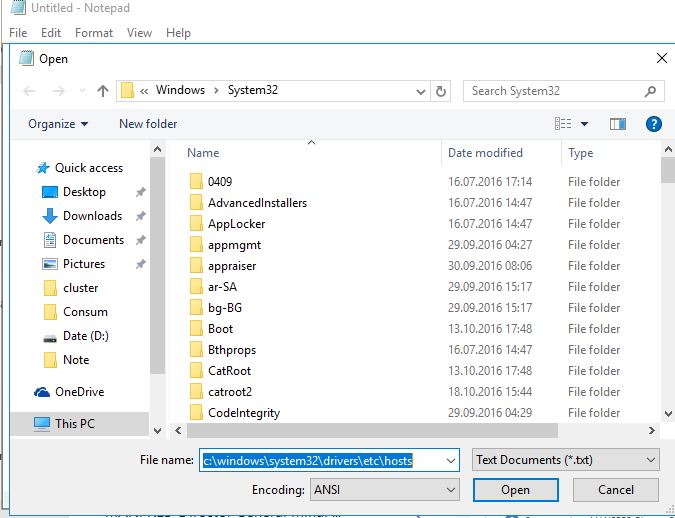
Open from Start NOTEPAD as administrator (run as administrator) and open the hosts file from C:\Windows\System32\drivers\etc
4.1 Open Notepad as Administrator (click right on Notepad and it will appear Run as Administrator)

4.2 Go to Notepad -> File -> Open and we open:
c:\windows\system32\drivers\etc\hosts
4.3 Add at the end of the file:
IP domain name, in our case: 86.127.127.127 www.clustercstest.example.org example.org webmail.example.org
Where:
- 1. 86.127.127.127 – External IP
- 2. www.clustercstest.example.org – the domain added in clustercs.com
- 3. clustercstest.example.org – domain without www
- 4. webmail.clustercstest.example.org – domain for webmail
After that SAVE
